
How to an Install Ape Hanger Cable Kit on a Harley-Davidson
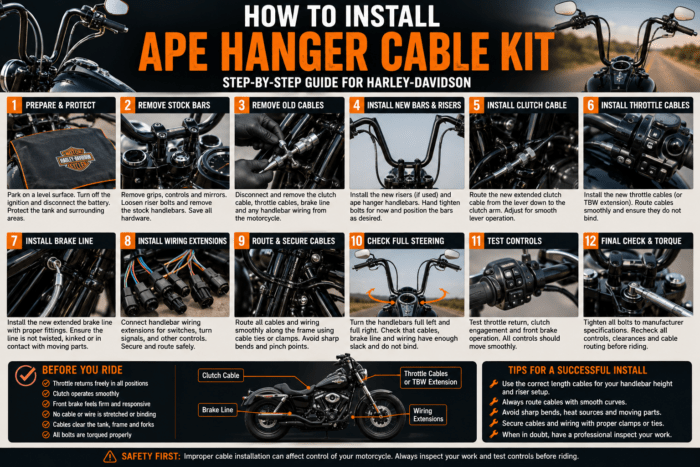
How to Install an Ape Hanger Cable Kit on a Harley-Davidson is an important step when upgrading to taller aftermarket handlebars. Ape hangers can transform the appearance and riding position of a Harley, but taller bars also move the controls farther away from their original locations.
That additional height can make the factory clutch cable, brake line, throttle cables, and handlebar wiring too short for the new setup.
Installing the correct Harley ape hanger cable kit provides the additional length needed for proper routing and control movement. How to Install an Ape Hanger Cable Kit 21 Front single disc Spoke Wheel and Tire
In this guide, we’ll explain how to install an ape hanger cable kit, how to choose the correct cable length, what components you may need, common installation mistakes, and the checks you should perform before riding. How to Install an Ape Hanger Cable Kit Chrome spokes wheels and white walls tires
What Is an Ape Hanger Cable Kit?
An ape hanger cable kit is a collection of extended components designed to accommodate taller handlebars.
Depending on your Harley model and the specific kit, it may include:
- Extended clutch cable
- Extended throttle cables
- Extended brake line
- Throttle-by-wire extension
- Handlebar wiring extensions
- Brake fittings
- Cable guides
- Installation hardware
Not every kit contains every component. How to Install an Ape Hanger Cable Kit
Before starting the installation, verify exactly what is included and confirm that the kit is compatible with your Harley-Davidson model and year. How to Install an Ape Hanger Cable Kit Legend air ride suspension for harley Davidson
Why Do You Need an Ape Hanger Cable Kit?
Factory cables and wiring are designed around the original handlebar position.
When you install taller ape hangers, the controls move upward and potentially farther away from the steering head. How to Install an Ape Hanger Cable Kit
This can cause the original components to become:
- Too short
- Stretched
- Tightly bent
- Difficult to route
- Restricted during steering
An appropriately sized extended cable kit provides additional length while allowing the controls to operate normally. How to Install an Ape Hanger Cable Kit
What You Need Before Installing Ape Hanger Cables
Before beginning the installation, gather the appropriate tools and replacement components.
Depending on your motorcycle and kit, you may need:
- Correct ape hanger cable kit
- Motorcycle service information
- Metric or SAE hand tools
- Wrenches
- Socket set
- Screwdrivers
- Torque wrench
- Cable ties or approved cable retainers
- Brake-system supplies where applicable
- Appropriate brake fluid where required
- Electrical tools for wiring extensions
- Protective material for the fuel tank
The exact tools depend on the Harley model and the components being replaced. How to Install an Ape Hanger Cable Kit Black Bassani 2-1 exhaust
Step 1: On How to Install an Ape Hanger Cable Kit Confirm Your Harley Model and Cable Kit
Before removing anything, verify that the cable kit matches your motorcycle.
Check:
- Harley model
- Model year
- Handlebar diameter
- Handlebar height
- Riser height
- Handlebar pullback
- Clutch type
- Throttle type
- Brake configuration
- Wiring configuration
This is especially important because Harley cable and control configurations can vary between models and years. How to Install an Ape Hanger Cable Kit
A cable kit designed for one Harley should not automatically be assumed to fit another.
Step 2: Measure Your Ape Hanger Setup
Cable length should not be selected based only on handlebar height.
Consider the entire setup:
Handlebar height + riser height + pullback + width + routing
For example, two motorcycles using 16-inch ape hangers may require different cable lengths if they have different risers or handlebar bends.
Before installation, verify the recommended cable length for your exact configuration.
Step 3: Protect the Fuel Tank
Before working around the handlebars, protect the fuel tank and surrounding painted surfaces.
A handlebar or tool can accidentally contact the tank during installation.
Use an appropriate protective cover designed for motorcycle work.
This is especially important when removing and repositioning the controls. How to Install an Ape Hanger Cable Kit Saddlemen Step-Up TTR Tuck and Roll Seat For Harley
Step 4: Photograph the Original Cable Routing
Before removing the original cables and wiring, take several photographs of the existing routing.
Photograph:
- Clutch cable path
- Brake line path
- Throttle cables
- Wiring harnesses
- Control connections
- Cable guides
- Steering-head routing
These pictures can be extremely useful when installing the new components.
The original routing may not be appropriate for the taller handlebars, but it provides a useful reference for understanding where the components connect.
Step 5: Remove the Original Handlebars and Controls
Follow the service procedure appropriate for your Harley.
Carefully remove the existing:
- Grips
- Switch housings
- Brake controls
- Clutch controls
- Throttle components
- Handlebar-mounted accessories
Keep track of fasteners and components.
Do not force components that appear stuck. How to Install an Ape Hanger Cable Kit LA Choppers 1-1/2 Grande Twin Peaks Touring Handlebar Ape 18″ Black Baggers FLHX
Step 6: Remove the Original Clutch Cable
If your Harley uses a cable-operated clutch, remove the original clutch cable according to the motorcycle manufacturer’s procedure.
Pay attention to:
- Adjustment points
- Cable brackets
- Connection points
- Routing
- Lever connection
Before installing the extended cable, compare its length with the original component.
The new cable should provide sufficient length for the new handlebar position without creating excessive slack.
Step 7: Install the Extended Clutch Cable
Route the new extended Harley clutch cable from the clutch control toward its connection point.
Avoid sharp bends.
The cable should have smooth curves and should not be:
- Pinched
- Stretched
- Trapped
- Rubbing against sharp edges
- Routed against hot components
Do not permanently secure the cable yet.
Leave enough flexibility to adjust the routing after the handlebars and controls are installed.
Step 8: Install the Extended Brake Line
The front brake line requires particular attention because it is part of the motorcycle’s hydraulic braking system.
Remove and install the brake line according to the applicable service procedure.
Verify:
- Correct fittings
- Correct banjo orientation
- Proper routing
- Adequate length
- No sharp bends
- No contact with moving components
After brake-line work, the brake system must be properly serviced and checked according to the motorcycle manufacturer’s requirements.
Do not ride if the brake lever feels abnormal or the braking system has not been properly inspected. How to Install an Ape Hanger Cable Kit FAT BAGGERS INC 1-1/4 EZ Install Meathook Handlebars 14″ Black Ape Hangers Cables
Step 9: Install Extended Throttle Cables
If your Harley uses traditional throttle cables, install the appropriate extended throttle components.
Depending on the motorcycle, there may be separate throttle and idle cables.
Route both cables smoothly.
Avoid:
- Sharp bends
- Excessive loops
- Tight steering-head areas
- Tank contact
- Hot engine or exhaust components
The throttle should operate smoothly throughout the entire steering range.
Step 10: Check Whether Your Harley Uses Throttle-by-Wire
Some Harley-Davidson motorcycles use electronic throttle-by-wire rather than traditional throttle cables.
If your motorcycle uses throttle-by-wire, the installation may require a compatible wiring extension rather than conventional throttle cables. How to Install an Ape Hanger Cable Kit
Before purchasing your kit, determine which throttle system your motorcycle uses.
Never assume that a traditional throttle cable kit is compatible with a throttle-by-wire motorcycle.
Step 11: Install Handlebar Wiring Extensions
Taller handlebars can require additional length for the electrical wiring connected to the handlebar controls.
Depending on the motorcycle, this may include:
- Turn signals
- Horn
- Lighting controls
- Switches
- Heated grips
- Throttle-by-wire wiring
- Other electronic controls
If the factory wiring becomes stretched, an appropriate Harley handlebar wiring extension may be required.
Route the wiring carefully and protect it from:
- Pinching
- Sharp edges
- Excessive heat
- Moving components
- Excessive tension
Step 12: Install the New Ape Hanger Handlebars
Position the new handlebars in the risers.
Before completely tightening the controls, establish the desired handlebar position.
Check:
- Handlebar angle
- Pullback
- Rider reach
- Tank clearance
- Fairing clearance
- Cable routing
- Wiring routing
Do not finalize the routing until you have tested the complete steering range. How to Install an Ape Hanger Cable Kit Custom Billet Mag Wheels Ironhorse Chopper 10.5 X18 3.50 X 21 Big Dog Wide Tire!
Step 13: Route the Cables and Wiring
This is one of the most important steps in the entire installation.
A correctly sized cable can still bind if routed incorrectly.
Create smooth cable paths from the controls toward the motorcycle’s connection points.
Avoid sharp bends and unnecessary loops.
Keep the cables away from:
- Exhaust components
- Moving suspension components
- Tire
- Steering stops
- Sharp frame edges
- Fuel tank contact points
Step 14: Check Full Steering Movement
With the handlebars installed but before finalizing cable routing, slowly turn the bars:
Full Left → Center → Full Right
Observe every cable and wire.
Look for:
- Tight cables
- Stretched wires
- Sharp bends
- Pinching
- Tank contact
- Fairing contact
- Fork contact
- Excessive slack
Repeat the test several times.
This is one of the most important checks for preventing ape hanger cable binding. How to Install an Ape Hanger Cable Kit 100″ Sidewinder Big Bore Kit For Harley Twin Cam 1999-2006
Step 15: Test the Throttle
The throttle should operate smoothly and return properly.
Test it with the handlebars:
- Centered
- Fully left
- Fully right
The throttle should not become heavier or stick when the handlebars are moved. How to Install an Ape Hanger Cable Kit
If throttle behavior changes with steering position, stop and correct the routing before riding. How to Install an Ape Hanger Cable Kit
Step 16: Check the Clutch
Operate the clutch lever with the handlebars centered.
Then turn the handlebars left and operate the clutch again.
Repeat with the handlebars fully right.
The clutch should have consistent operation throughout the steering range.
If the lever becomes significantly harder to operate or the cable becomes tight, inspect the cable routing and length. How to Install an Ape Hanger Cable Kit Mustang Extended Arm Wrap-Around Backrest For Harley Touring
Step 17: Check the Brake System
Inspect the front brake system carefully.
Verify that the brake line:
- Has adequate length
- Is correctly routed
- Does not become tight
- Does not contact the tire
- Does not contact moving components
- Does not have sharp bends
After any hydraulic brake-system work, follow the manufacturer’s bleeding, fluid, and inspection procedures.
The brake lever should have the appropriate feel before the motorcycle is ridden.
Step 18: Check Fuel Tank and Fairing Clearance
Turn the handlebars from full left to full right.
Check the clearance between the controls and:
- Fuel tank
- Fairing
- Gauges
- Fork
- Frame
- Other components
A brake master cylinder or switch housing that contacts the fuel tank can cause damage and may limit steering. How to Install an Ape Hanger Cable Kit
Correct the handlebar position or component selection if necessary. Saddlemen Roadsofa LS Lattice Stitch 2-Up Seat For Harley
Step 19: Secure the Cables and Wiring
Once you’ve confirmed that everything moves correctly, secure the cables and wiring using appropriate retainers.
Avoid creating tight cable ties that compress or restrict the cables.
The components should remain properly routed while retaining enough freedom of movement for steering. How to Install an Ape Hanger Cable Kit
Step 20: on How to Install an Ape Hanger Cable Kit Tighten the Handlebar and Controls
Once the final position has been established, tighten the handlebar and controls according to the motorcycle and component manufacturer’s specifications.
Use a torque wrench where specified.
Don’t guess torque values.
Incorrectly tightened controls can move during riding, while excessive tightening can damage components. How to Install an Ape Hanger Cable Kit Black Prodigy rims
Step 21: Perform a Complete Pre-Ride Inspection
Before riding, inspect the entire installation.
Handlebar
- Secure
- Correctly positioned
- Properly torqued
Throttle
- Smooth
- Returns correctly
- No binding
Clutch
- Smooth operation
- Correct adjustment
Brake
Cables
- No tension
- No sharp bends
- No excessive slack
Wiring
- No pinching
- No stretching
- Properly secured
Steering
- Full left and right movement
Clearance
- No contact with tank
- No contact with fairing
- No tire interference
- No interference with moving components
How to Install an Ape Hanger Cable Kit Legend air ride suspension for harley Davidson
Pingback: Harley Ape Hanger Handlebars Fitting - HARLEY WAREHOUSE
Pingback: How to Avoid ape hangers Cable Binding
Pingback: Best Ape Hanger Cable Kit for Harley - HARLEY WAREHOUSE