
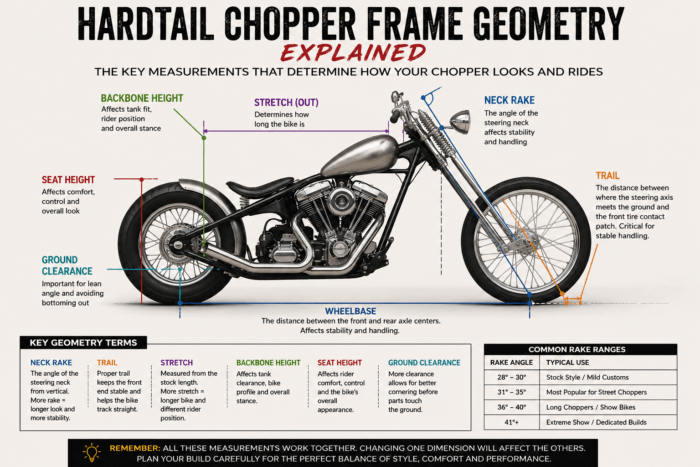
hardtail chopper frame geometry explained
Building a hardtail chopper from scratch is one of the most rewarding motorcycle projects you can take on. It’s raw, mechanical, and completely personal. Unlike bolt-on customs, a hardtail build forces you to think through geometry, fitment, and fabrication from the ground up. Sugar Bear springer front end
If you’re ready to build your own rigid chopper, this step-by-step guide will walk you through the entire process. hardtail chopper frame geometry explained Chopper Frames for sale
What Is a Hardtail Chopper?
A hardtail (rigid) motorcycle has no rear suspension. The axle mounts directly to the frame, creating:
- A clean, minimalist look
- Lower weight
- Classic old-school styling
- Direct road feedback
Many hardtail builds are based around V-twin drivetrains inspired by Harley-Davidson platforms, but the same principles apply to other engine setups. hardtail chopper frame geometry explained Harley Roadster Gas tank FXR Center fill 1983-85 XLS OEM Ironhead Sportster 4.2
Step 1: Plan Your Build Vision
Before buying parts, define your goal:
- Long-fork show bike?
- Low-slung bobber?
- Classic 70s chopper?
- Performance-focused rigid build?
Your vision determines:
- Rake angle
- Stretch length
- Tire size
- Tank and seat style
- Handlebar setup
Write everything down. Planning prevents expensive mistakes. hardtail chopper frame geometry explained Hardtail vs Softail Chopper Frames: Which Is Better?
Step 2: Choose the Right Hardtail Frame
The frame is the backbone of your build.
Decide on:
- Rake angle (30°–38° is common for stable street builds)
- Stretch configuration
- Axle plate type
- Engine compatibility
Make sure the frame is built from DOM steel and has strong welds with proper neck reinforcement. hardtail chopper frame geometry explained Common Mistakes When Buying a Hardtail Chopper Frame
Buying a quality hardtail frame saves time and ensures correct alignment.
Step 3: Select Your Engine & Transmission
Confirm compatibility before purchasing.
Common considerations:
- Engine type (Evo-style, aftermarket V-twin, etc.)
- Transmission setup
- Primary drive configuration
- Final drive (chain or belt)
Ensure mounting points align correctly with your chosen frame. hardtail chopper frame geometry explained Turtle Tank Ironhead Sportster 1963-1972
Step 4: Mock Up the Rolling Chassis
Before final assembly:
- Install the neck bearings and front end
- Mount the engine and transmission
- Install rear wheel and axle
- Fit the front wheel
This “mock-up” stage allows you to:
- Check alignment
- Confirm chain/belt spacing
- Adjust tire clearance
- Measure ride height
Do not skip this step. Step-by-Step Guide to Building a Hardtail Chopper from Scratch
Step 5: Install the Front End
Choose forks based on:
- Desired length
- Rake and trail geometry
- Riding style
Too much fork length without proper trail correction can cause unstable handling. Make sure your geometry is balanced.
Step 6: Fit the Gas Tank & Seat
Mount the gas tank after confirming engine placement.
Check for:
- Proper tunnel fitment
- Backbone clearance
- Petcock positioning
Seat choice depends on your style:
- Solo spring seat (classic look)
- Rigid mount seat
- Custom fabricated pan
Hardtail bikes often use lower-profile seats to enhance the rigid aesthetic. hardtail chopper frame geometry explained 100″ Sidewinder Big Bore Kit For Harley Twin Cam 1999-2006
Step 7: Wiring & Electrical Setup
Keep it simple.
A basic hardtail build may include:
- Battery
- Ignition system
- Starter (if applicable)
- Headlight
- Tail/brake light
Route wiring cleanly along the frame backbone or under the seat pan for a minimal look. hardtail chopper frame geometry explained
Step 8: Brakes & Controls
Install:
- Front brake system
- Rear brake caliper and master cylinder
- Clutch cable or hydraulic system
- Throttle cables
Test cable routing carefully to avoid binding, especially with ape hangers or custom bars.
Step 9: Final Alignment & Torque
Before first start:
- Check all fasteners
- Align rear wheel
- Confirm chain/belt tension
- Verify brake function
- Ensure proper fluid levels
Take your time. This is about safety. hardtail chopper frame geometry explained Rebuilt 103″ Engine Motor Harley B Softail Heritage Fatboy Twin Cam Springer
Step 10: Paint & Finishing
Once everything fits correctly:
- Disassemble
- Paint or powder coat the frame
- Finish metal components
- Reassemble carefully
Never paint before mock-up — modifications may be needed. hardtail chopper frame geometry explained
Pingback: Hardtail vs Softail Chopper Frames - HARLEY WAREHOUSE
Pingback: How to Choose the Right Hardtail Chopper Frame for Your Build - HARLEY WAREHOUSE