
Thunderheader for FXR: Installation Guide & Tuning Tips
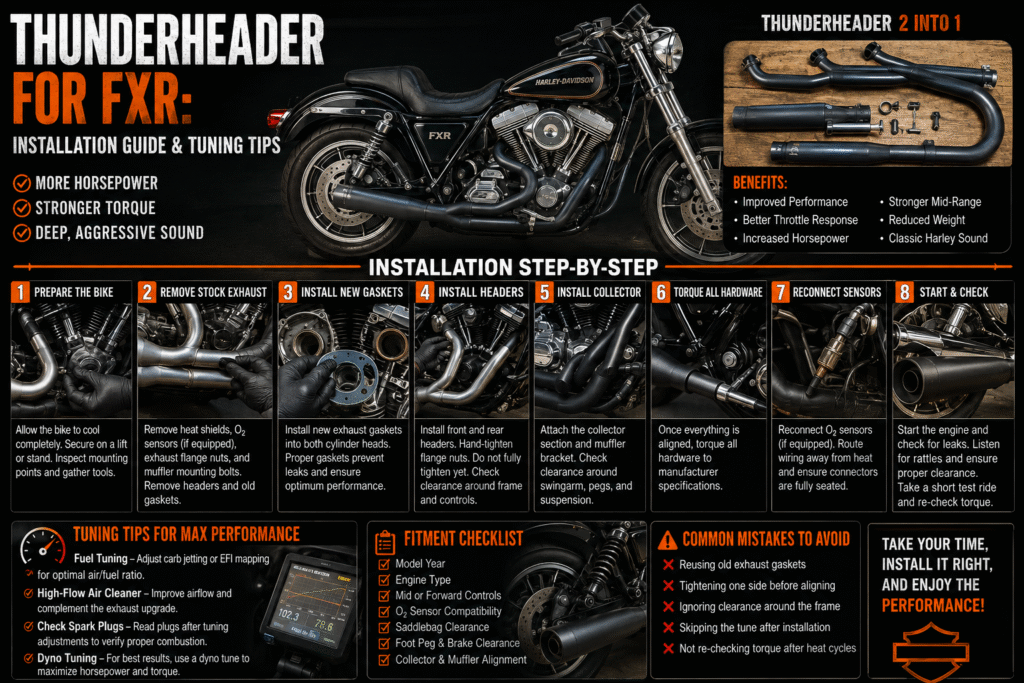
Thunderheader for FXR Installation Guide, Upgrading your FXR exhaust is one of the fastest ways to unlock better throttle response, stronger torque, and a more aggressive sound. Among performance exhaust systems for motorcycles from Harley-Davidson, Thunderheader remains one of the most respected names in the FXR community. 80 spokes dual disc front wheel
Thunderheader for FXR Installation Guide, If you’re planning to install a Thunderheader on your FXR, this guide will walk you through the installation process and the critical tuning steps that ensure you get maximum performance. Chrome Thunder-header exhaust system
Why Install a Thunderheader on an FXR?
Before diving into installation, it helps to understand why riders choose Thunderheader.
Thunderheader designs performance-driven 2-into-1 systems known for:
- Strong mid-range torque
- Improved throttle response
- Aggressive exhaust tone
- Proven FXR compatibility
However, proper installation and tuning are essential to unlocking these benefits. Common FXR Gas Tank Problems and How to Fix Them
Part 1: Thunderheader FXR Installation Guide
⚠️ Always let your bike cool completely before starting work.
Tools You’ll Typically Need
- Socket set
- Torque wrench
- Combination wrenches
- Exhaust gasket replacements
- Anti-seize compound
- Thread locker (medium strength)
Step 1: Remove the Stock Exhaust
- Disconnect the negative battery terminal (recommended for safety).
- Remove heat shields from the stock exhaust.
- Loosen the exhaust mounting bolts.
- Carefully remove the head pipe nuts at the cylinder heads.
- Remove the stock exhaust system completely.
Inspect the exhaust ports and clean any leftover gasket material. Thunderheader for FXR Installation Guide Chrome Thunder-header exhaust system
Step 2: Install New Exhaust Gaskets
Never reuse old exhaust gaskets.
- Install fresh exhaust port gaskets.
- Ensure they seat evenly inside the cylinder head.
This prevents exhaust leaks, which can reduce performance and cause tuning issues.
Step 3: Mount the Thunderheader
- Position the Thunderheader head pipes onto the cylinder studs.
- Loosely install flange nuts (do not fully tighten yet).
- Attach the mounting bracket to the frame.
- Install mounting bolts but keep them slightly loose.
Keeping everything loose at first allows proper alignment before final torque. Thunderheader for FXR Installation Guide best exhaust for harley fxr; is thunderheader worth it?
Step 4: Align and Torque Properly
Proper alignment is critical on FXR frames.
- Ensure adequate clearance from frame, swingarm, and foot controls.
- Confirm collector alignment.
- Once satisfied, torque head bolts evenly to manufacturer specifications.
- Tighten mounting bracket bolts securely.
Step 5: Install Heat Shields and Final Checks
- Install heat shields if applicable.
- Check all fasteners.
- Reconnect the battery.
- Start the bike briefly to check for leaks.
Listen for ticking sounds near exhaust ports — this may indicate a gasket leak. Thunderheader for FXR Installation Guide fxr thunderheader vs 2 into 1 exhaust: which one makes more power?
Part 2: Thunderheader FXR Tuning Tips
This is where many riders make mistakes.
Installing a performance exhaust without tuning can cause:
- Lean fuel conditions
- Poor throttle response
- Overheating
- Reduced performance
Proper tuning ensures you get real power gains. Thunderheader for FXR Installation Guide 2 into 1 chrome Bassani exhaust
Carbureted FXR Tuning Tips
If your FXR is carbureted:
1. Rejet the Carburetor
You’ll likely need:
- Larger main jet
- Adjusted pilot jet
- Needle position adjustment
Thunderheader increases airflow, which requires more fuel.
2. Adjust Air/Fuel Mixture
Fine-tune the idle mixture screw for smooth idle and clean throttle response.
3. Check Spark Plug Color
After test riding:
- Light tan = good
- White = lean (needs more fuel)
- Black = rich
EFI FXR Tuning Tips
If your FXR is fuel-injected:
1. Flash or Remap the ECU
Use a tuning device or professional dyno tuning to adjust:
- Fuel maps
- Air/fuel ratios
- Timing curves
2. Target Safe Air/Fuel Ratios
For performance riding:
- Around 13.0:1 under load
- Slightly leaner at cruise
Professional dyno tuning produces the best results. Thunderheader for FXR Installation Guide
Thunderheader for FXR Installation Guide Common Installation Mistakes to Avoid
- Reusing old exhaust gaskets
- Fully tightening bolts before alignment
- Skipping tuning adjustments
- Ignoring small exhaust leaks
- Not checking frame clearance
Avoiding these mistakes protects both performance and engine health. How to Install a Harley Peanut Tank (Step-by-Step Guide)
How Much Power Can You Expect?
On stock or mildly upgraded FXR engines, properly tuned Thunderheader installations typically result in:
- Stronger mid-range torque
- Faster roll-on acceleration
- More responsive throttle
- Noticeable performance improvement
Actual horsepower gains vary depending on:
- Camshaft selection
- Air cleaner setup
- Carb/EFI tuning quality
- Engine displacement
Remember — tuning quality matters more than brand name. Thunderheader for FXR Installation Guide
Is Professional Installation Worth It?
If you’re comfortable with mechanical work, installing a Thunderheader on an FXR is manageable.
However, professional installation is recommended if:
- You’re unfamiliar with carb tuning
- You have EFI and need ECU remapping
- Your bike has other performance upgrades
- You want dyno-verified results
A properly tuned setup will always outperform a DIY install without tuning. Thunderheader for FXR Installation Guide Inner Primary Harley FLT Tour Glide 1981-1984? OEM FLHS 5 speed FXR Shovelhead E
Pingback: Thunderheader FXR Fitment Guide by Year - HARLEY WAREHOUSE
Pingback: Common FXR Gas Tank Problems and How to Fix Them - HARLEY WAREHOUSE