
Hard saddlebags are one of the most popular upgrades among Harley-Davidson riders. They add secure storage, improve touring convenience, and give your motorcycle a sleek custom appearance. Whether you’re installing hard saddlebags on a Street Glide, Road King, Softail, Dyna, or Sportster, proper installation is essential for safety and durability. How to Mount Harley Hard Saddlebags OEM Factory Saddlebags Harley Touring Ultra Classic Glide King 93-13 Blue silver
In this guide, you’ll learn exactly how to mount Harley hard saddlebags, the tools you’ll need, and how to avoid common installation mistakes.
Why Choose Hard Saddlebags for Your Harley?
Many riders prefer hard saddlebags because they offer:
- Better weather protection
- Enhanced security with locking systems
- Increased storage capacity
- Improved touring comfort
- Custom Harley-Davidson styling
Unlike soft saddlebags, hard bags maintain their shape and provide superior protection for your belongings during long rides. How to Mount Harley Hard Saddlebags Hard Saddlebags vs Soft Saddlebags for Harley: Which Is Better?
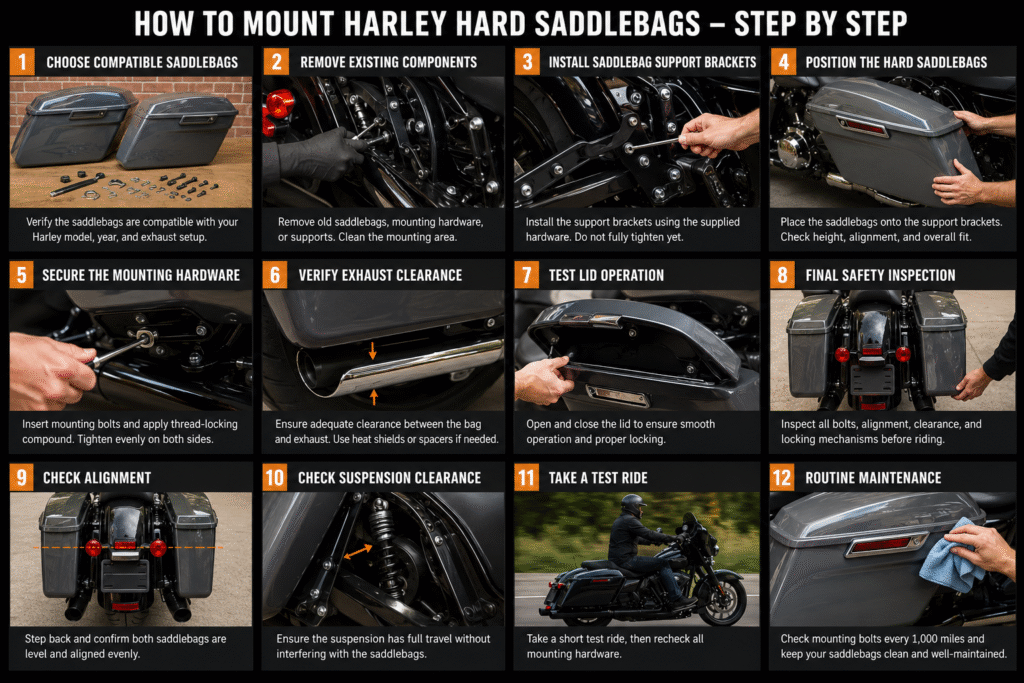
Tools You’ll Need
Before starting the installation, gather the following tools:
- Socket wrench set
- Allen wrench set
- Torque wrench
- Screwdrivers
- Thread-locking compound
- Mounting hardware kit
- Measuring tape
- Clean microfiber cloth
Having all tools ready will make the installation process much smoother.
Step 1: Choose Compatible Hard Saddlebags
Not all hard saddlebags fit every Harley model.
Before purchasing, verify compatibility with your motorcycle’s:
- Year
- Make
- Model
- Fender configuration
- Exhaust setup
Popular Harley models requiring specific saddlebag fitment include:
- Street Glide
- Road Glide
- Road King
- Heritage Softail
- Softail Standard
- Dyna models
- Sportster models
Always check manufacturer fitment specifications before ordering. How to Mount Harley Hard Saddlebags Best Hard Saddlebags for Harley-Davidson in 2026
Step 2: Remove Existing Components
If your bike already has:
- Soft saddlebags
- Saddlebag supports
- Docking hardware
- Passenger accessories
Remove them carefully according to the manufacturer’s instructions.
Clean the mounting area thoroughly before proceeding.
Step 3: Install Saddlebag Support Brackets
Most Harley hard saddlebags require support brackets.
Locate the factory mounting points near the rear fender and shock absorbers.
Install the support brackets using the supplied hardware. Home
Important tips:
- Do not fully tighten bolts initially.
- Ensure brackets are level on both sides.
- Verify clearance from exhaust pipes.
- Confirm suspension travel will not interfere with the bags.
Leaving bolts slightly loose allows adjustments during final alignment.
Step 4: Position the Hard Saddlebags
Place the saddlebags onto the installed support brackets.
Check:
- Bag height
- Distance from rear wheel
- Exhaust clearance
- Fender alignment
Both bags should sit evenly when viewed from the rear of the motorcycle.
Take your time during this step because proper alignment significantly affects appearance and functionality. How to Mount Harley Hard Saddlebags Saddlemen Roadsofa HC Honeycomb 2-Up Seat For Harley
Step 5: Secure the Mounting Hardware
Insert the supplied mounting bolts through the saddlebag mounting holes.
Apply a small amount of thread-locking compound to prevent bolts from loosening due to vibration.
Tighten the hardware gradually while maintaining alignment.
Use a torque wrench whenever possible and follow the manufacturer’s recommended torque specifications.
Step 6: Verify Exhaust Clearance
One of the most common installation mistakes is insufficient clearance between the saddlebag and exhaust system.
Check that:
- The saddlebag does not touch the exhaust.
- Heat shields are properly installed.
- There is adequate space during suspension movement.
If necessary, install saddlebag spacers or heat shields to prevent heat damage. How to Mount Harley Hard Saddlebags Harley Touring 100th Anniversary Saddlebags Black OEM ASsy Nice FLH ultra Classic
Step 7: Test Lid Operation
Open and close each saddlebag lid several times.
Ensure:
- Locks function properly
- Hinges move smoothly
- Lids seal correctly
- No interference exists with passenger foot pegs or accessories
Proper lid operation prevents future issues on long rides.
Step 8: Perform a Final Safety Inspection
Before riding, inspect:
- All mounting bolts
- Bracket alignment
- Suspension clearance
- Rear wheel clearance
- Exhaust clearance
- Locking mechanisms
Take a short test ride and recheck all hardware afterward. How to Mount Harley Hard Saddlebags LA Choppers 1-1/2 Grande Twin Peaks Touring Handlebar Ape 18″ Black Baggers FLHX
Common Harley Saddlebag Installation Mistakes
Avoid these common errors:
Overtightening Hardware
Excessive torque can crack fiberglass or ABS saddlebag materials.
Ignoring Exhaust Heat
Heat damage can permanently deform hard saddlebags.
Uneven Alignment
Misaligned bags affect both appearance and handling.
Skipping Thread Locker
Harley engines produce significant vibration that can loosen mounting hardware over time.
Maintaining Your Harley Hard Saddlebags
After installation:
- Check mounting bolts every 1,000 miles
- Clean bags regularly
- Lubricate locks periodically
- Inspect brackets for corrosion
- Verify proper alignment after long trips
Routine maintenance helps maximize the lifespan of your saddlebags. How to Mount Harley Hard Saddlebags
Pingback: Hard Saddlebags vs Soft Saddlebags for Harley: Which Is Better? - HARLEY WAREHOUSE