
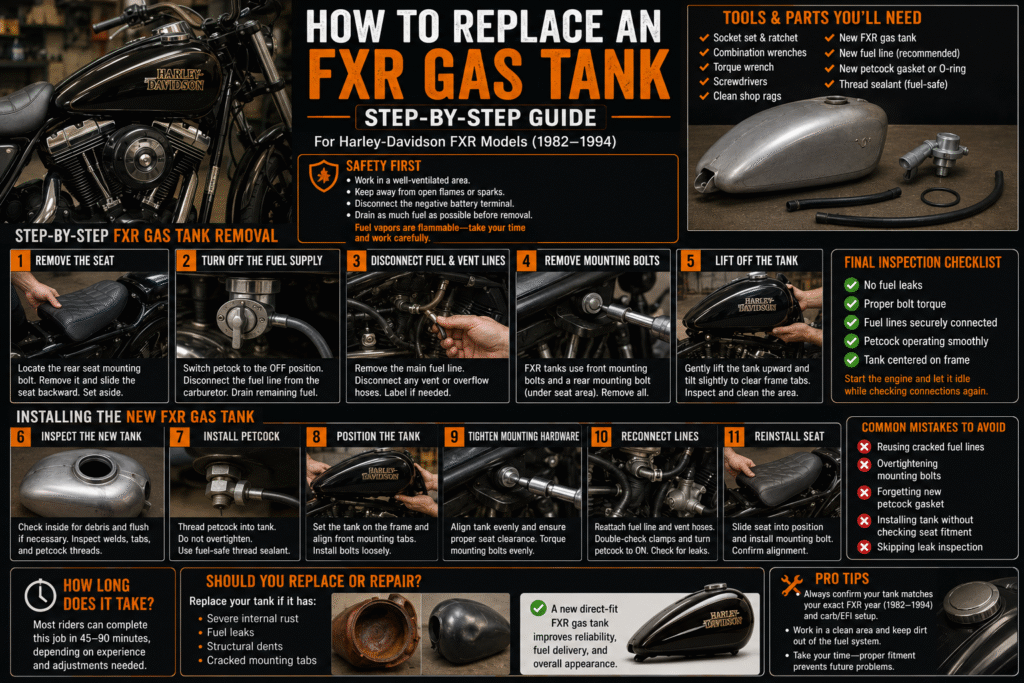
How to Replace an FXR Gas Tank (Step-by-Step Guide)
If your fuel tank is rusted, leaking, dented, or you’re upgrading to a stretched style, learning how to replace an FXR gas tank can save time and money. The FXR platform from Harley-Davidson (1982–1994) uses a straightforward mounting setup, making this a manageable DIY job for most riders.Harley Roadster Gas tank FXR Center fill 1983-85 XLS OEM Ironhead Sportster 4.2
This step-by-step guide on how to replace an FXR gas tank walks you through safe removal and installation — plus tips to avoid common mistakes. Genuine OEM Harley Davidson FXR Center Fill Red Gas Tank FXRT FXRS
Tools & Parts You’ll Need
Before you begin, gather:
- Socket set & ratchet
- Combination wrenches
- Torque wrench
- Screwdrivers
- New fuel tank (FXR-specific fitment)
- New fuel line (recommended)
- New petcock gasket or O-ring
- Thread sealant (fuel-safe)
- Clean shop rags
Tip: Always confirm your tank matches your exact FXR year (1982–1994) and carb/EFI setup before starting.
Safety First
- Work in a well-ventilated area.
- Keep away from open flames or sparks.
- Disconnect the negative battery terminal.
- Drain as much fuel as possible before removal.
Fuel vapors are flammable — take your time and work carefully. how to replace an FXR gas tank Black OEM Gas Tank Factory Sportster XLH XLCH Ironhead 1957-1978 Peanut 900 1000
Step-by-Step FXR Gas Tank Removal
Step 1: Remove the Seat
- Locate the rear seat mounting bolt.
- Remove it and slide the seat backward.
- Set aside safely.
This exposes the rear tank mounting point.
Step 2: Turn Off the Fuel Supply
- Switch petcock to the OFF position.
- Disconnect the fuel line from the carburetor.
- Use a rag to catch any remaining fuel.
If your tank still has fuel, drain it into an approved container. how to replace an FXR gas tank 2007-2016 sportster gas tank Peanut FI 883 1200 Forty eight iron nightster oem
Step 3: Disconnect Fuel & Vent Lines
- Remove the main fuel line.
- Disconnect any vent or overflow hoses.
Label hoses if needed to avoid confusion during installation.
Step 4: Remove Mounting Bolts
FXR tanks typically use:
- Front mounting bolts
- Rear mounting bolt (under seat area)
Loosen and remove all mounting hardware carefully.
Step 5: Lift Off the Tank
- Gently lift the tank upward.
- Tilt slightly to clear frame tabs.
- Inspect frame mounting points for cracks or wear.
Now is a good time to clean the frame area. how to replace an FXR gas tank Factory Paint Emblems Harley Turtle Gas Tank Ironhead Sportster 1965 OEM XLH Vtg
Installing the New FXR Gas Tank
Step 6: Inspect the New Tank
Before installation:
- Check inside for debris
- Flush with clean fuel if necessary
- Inspect welds and mounting tabs
- Confirm petcock threads are clean
If installing a new petcock, apply fuel-safe thread sealant.
Step 7: on how to replace an FXR gas tank Install Petcock
- Thread petcock into tank carefully
- Do not overtighten
- Ensure proper alignment for fuel line routing
Allow sealant to set if required.
Step 8: Position the Tank
- Place the new tank onto the frame
- Align front mounting tabs
- Install bolts loosely at first
Do not fully tighten until all bolts are started.
Step 9: Tighten Mounting Hardware
- Align tank evenly
- Ensure proper seat clearance
- Torque mounting bolts evenly
Proper alignment prevents stress cracks over time. how to replace an FXR gas tank
Step 10: Reconnect Fuel & Vent Lines
- Reattach main fuel line
- Secure vent hoses
- Double-check clamps
Turn petcock to ON briefly and inspect for leaks.
Step 11: Reinstall Seat
- Slide seat into position
- Install mounting bolt
- Confirm tank and seat alignment
Final Inspection Checklist
Before riding:
✔ No fuel leaks
✔ Proper bolt torque
✔ Fuel line securely connected
✔ Petcock operating smoothly
✔ Tank centered on frame
Start the engine and let it idle while checking connections again.
how to replace an FXR gas tank check Common Mistakes to Avoid
- Reusing cracked fuel lines
- Overtightening mounting bolts
- Forgetting new petcock gasket
- Installing tank without checking seat fitment
- Skipping leak inspection
Taking a few extra minutes here prevents long-term problems. Genuine OEM Harley Davidson FXR Center Fill Red Gas Tank FXRT FXRS
How Long Does It Take?
Most riders can complete this job in 45–90 minutes, depending on experience and whether the tank requires petcock installation or minor adjustments.
Should You Replace or Repair an FXR Gas Tank?
Replace the tank if it has:
- Severe internal rust
- Fuel leaks
- Structural dents
- Cracked mounting tabs
A new direct-fit FXR gas tank improves reliability, fuel delivery, and overall appearance. harleydavidson.com
Pingback: FXR Gas Tank Fitment Guides - HARLEY WAREHOUSE
Pingback: OEM vs Aftermarket FXR Gas Tank: Which Should You Buy? - HARLEY WAREHOUSE
Pingback: Common FXR Gas Tank Problems and How to Fix Them - HARLEY WAREHOUSE