How to Install Air Ride Suspension on a Harley-Davidson (Step-by-Step Guide)
How to install air ride suspension on harley, installing an air ride suspension on a Harley-Davidson is one of the best upgrades you can make for comfort, ride height control, and long-distance touring performance. Many Harley riders assume air suspension installation is complicated, but with the right tools and preparation, it can be done at home or with minimal shop help.
This guide explains how to install air ride suspension on a Harley, step by step, with a focus on Harley Touring models like the Street Glide, Road Glide, Road King, and Ultra Limited. Black Air Ride Suspension with the mounting kits
What Is Air Ride Suspension on a Harley?
Air ride suspension replaces your factory rear shocks (and sometimes front components) with air-adjustable shocks. These shocks use compressed air instead of fixed springs, allowing you to raise or lower your Harley depending on load and riding conditions.
Benefits include:
-
Adjustable ride height
-
Smoother ride on rough roads
-
Better control when riding two-up
-
Improved comfort for long-distance touring
What You Need Before Installing Air Ride Suspension
Before starting, make sure you have:
Tools Required
-
Motorcycle jack or lift
-
Socket and wrench set
-
Torque wrench
-
Airline cutter or sharp blade
-
Zip ties
-
Thread locker
Parts Included in Most Air Ride Kits
-
Air shocks (rear or front & rear)
-
Air lines
-
Compressor or manual fill valve
-
Pressure switch or handlebar control
-
Mounting hardware
Always confirm the kit is compatible with your Harley model and year.
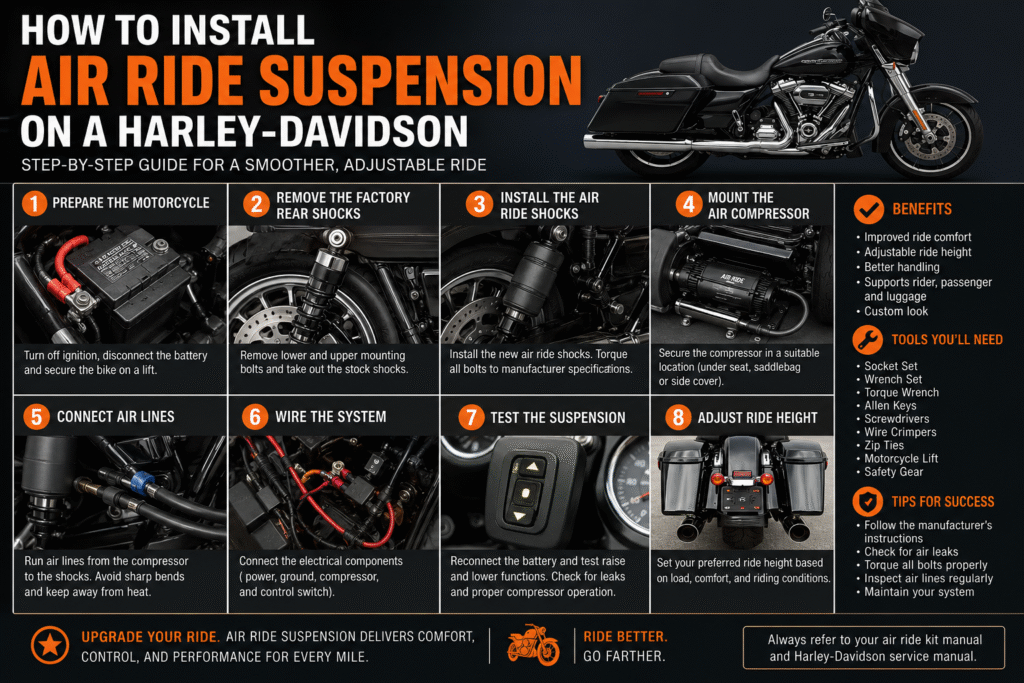
Step-by-Step: How to Install Air Ride Suspension on a Harley
Step 1: Secure the Motorcycle
Place your Harley on a motorcycle lift or jack so the rear wheel is slightly off the ground. This removes pressure from the rear shocks and makes removal easier. Legend air ride suspension for harley Davidson
Step 2: Remove the Stock Rear Shocks
-
Loosen the upper and lower shock bolts
-
Support the swingarm
-
Remove both factory shocks carefully
Keep the bolts if your air ride kit requires reuse.
Step 3: Install the Air Ride Shocks
-
Mount the air shocks in the same position as the stock shocks
-
Torque bolts to factory specifications
-
Ensure air fittings are facing the correct direction
Do not overtighten air fittings.
Step 4: Route the Air Lines
-
Cut air lines clean and straight
-
Route away from exhaust heat and moving parts
-
Secure with zip ties
-
Avoid sharp bends that may restrict airflow
Proper air line routing is critical for long-term reliability.
Step 5: Install the Compressor or Air Valve
Depending on your kit:
-
Mount the compressor under the seat or side cover
-
Or install a manual Schrader valve for hand inflation
Ensure electrical connections are secure if using a compressor.
Step 6: Connect Electrical Components (If Equipped)
-
Wire the compressor to the battery
-
Install switches or handlebar controls
-
Test power before final assembly
Always follow the wiring diagram provided by the manufacturer.
Step 7: Test for Air Leaks
-
Inflate the system slowly
-
Spray soapy water on fittings
-
Look for bubbles indicating leaks
Fix leaks before riding.
Step 8: Adjust Ride Height and Pressure
Set air pressure according to:
-
Rider weight
-
Passenger weight
-
Riding style
Most Harley air ride systems operate between 5–100 PSI, depending on load.
Common Mistakes to Avoid
-
Routing air lines near hot exhaust components
-
Overinflating air shocks
-
Skipping torque specs
-
Ignoring leak checks
Avoiding these mistakes extends the life of your air ride system.
Is Professional Installation Necessary?
Many Harley owners install rear air ride kits at home. However, professional installation is recommended if:
-
You’re installing a full front and rear system
-
Electrical wiring is involved
-
You’re unfamiliar with suspension work
Best Harley Models for Air Ride Installation
Air ride suspension works best on:
-
Harley-Davidson Street Glide
-
Harley-Davidson Road Glide
-
Harley-Davidson Road King
-
Harley-Davidson Ultra Limited
These touring models benefit the most from adjustable ride height and improved load handling. http://harleydavidson.com